Over the last couple of weeks I managed to build a Spring Boot application that enables users to authenticate with their Solid pod.
1.0 Solid
In the current landscape of Solid, developers do not have much tooling or frameworks to use. We only have the Inrupt’s Solid Client library that can be used for authenticating, reading and writing data to a Solid pod. There is only one issue, this library is only available in JavaScript.
2.0 Goal of the project
As a Solid developer, I wanted to build an application that integrates Solid with Java. I started my project by creating a Spring Boot application with the online wizard Spring Initializr. We need a basic Maven (or Gradle) setup with 3 dependencies: Spring Web, OAuth2 Client and Lombok.
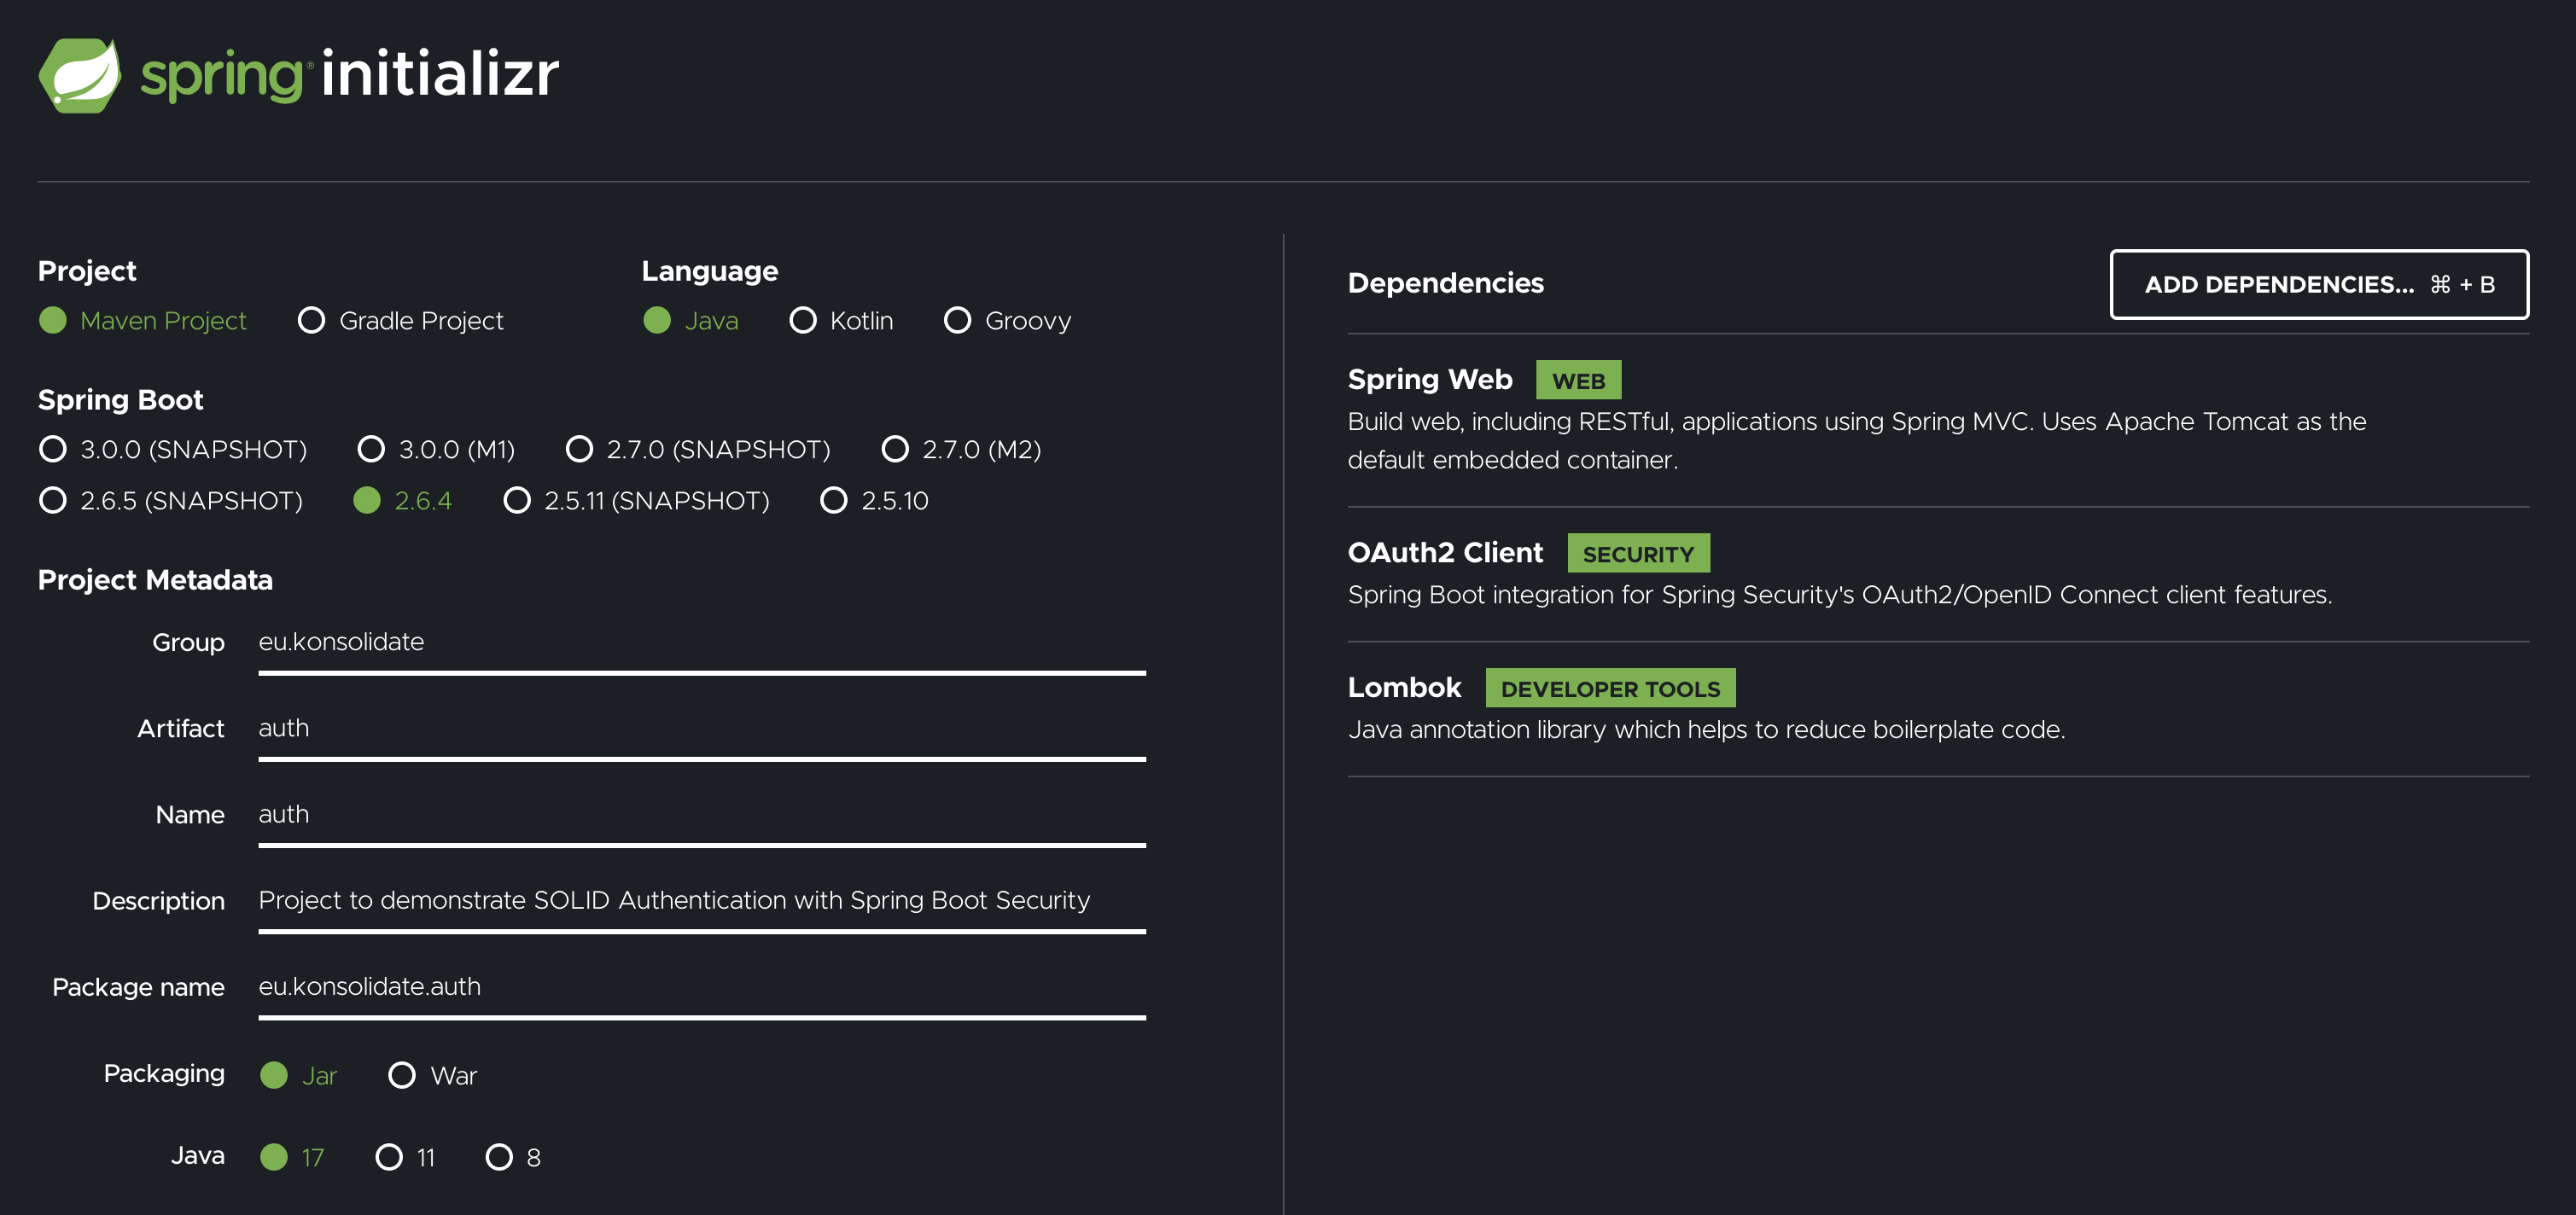
My plan was to integrate the Solid OIDC Primer with Spring Security. Hence why we need the OAuth2 Client dependency. This dependency makes sure we can configure Spring Boot and Spring Security so that our application can act as an OAuth2 Client.
3.0 Before you read
For the remainder of the article, I assume that the reader has a basic understanding of the key concepts listed below.
3.1 OAuth2 (Authorization Code flow)
OAuth2 is an authorization framework that allows applications to access protected resources hosted by a third party on behalf of a user.
In my project: a user can login with their Solid pod in my application (to read protected resources - which is a future case).
Read more about OAuth2:
• https://oauth.net/2/
• https://auth0.com/intro-to-iam/what-is-oauth-2/
• https://medium.com/@danyalraja/oauth-in-plain-english-f1b0bc5275f0
3.2 OIDC (read: OpenID Connect)
OpenID Connect is a layer on top of OAuth2. It makes sure that the Identity Provider can expose login and profile information about the person that is logged in.
I did a quick Google search for explaining the difference between OIDC and OAuth2:
It is different from OAuth2 because OIDC is more about “proving who you are” where OAuth2 is more about “authorization” (granting access to functionality, data, …)
Source: https://stackoverflow.com/questions/1087031/whats-the-difference-between-openid-and-oauth
Read more about OIDC:
• https://github.com/solid/webid-oidc-spec
• https://openid.net/connect/
• http://cakebaker.42dh.com/2008/04/01/openid-versus-oauth-from-the-users-perspective/
• https://softwareas.com/oauth-openid-youre-barking-up-the-wrong-tree-if-you-think-theyre-the-same-thing/
3.3 PKCE (Proof Key for Code Exchange)
Solid uses an extra layer of security on top of the Authorization Code flow for OAuth2: PKCE (read: Pixie). PKCE was introduced because malicious apps can execute a so called “Authorization Code Interception Attack”. This is an attack where the Authorization Code gets stolen from the client. With this code, the malicious app can also request an access token.
PKCE prevents the Authorization Code Interception Attacks by Proof of Possession when requesting the Authorization Code. The client should create:
• Code verifier: a high-entropy cryptographic random string (min 43 - max 128 characters)
• Code challenge: hashing the code verifier with the SHA256 algorithm, and encode the result in base64 URL encoding -> Base64UrlEncode(SHA256Hash(code_verifier))
• Code challenge method: paramater that you send to the Identity Provider to let it know which algorithm you chose for hashing the code verifier (in our case “S256”)
Read more about PKCE:
• https://medium.com/identity-beyond-borders/what-the-heck-is-pkce-40662e801a76
3.4 DPoP tokens
DPoP (Demonstration Proof of Possession) tokens are used as an extension on OAuth2 for extra security measures. It is a technique that describes how to cryptographically bind access tokens to a particular client when they are issued.
Source: https://oauth.net/2/dpop/
Read more about DPoP tokens:
• https://solid.github.io/solid-oidc/#tokens-id
• https://oauth.net/2/dpop/
4.0 Challenges
Solid servers and clients must be very secure. As specified in the Solid OIDC document and the Solid OIDC Primer, both server and client need to implement OAuth2 with OpenID Connect.
I wanted to make a Spring Boot project that is Solid OIDC compliant. To do that, I had to overwrite some Spring Security configuration classes for OAuth2 and OIDC. The Solid OIDC flow is documented here. (https://solid.github.io/solid-oidc/primer/#solid-oidc-flow)
5.0 Implementation
5.1 Configure Solid servers with Spring Security
The first thing you have to do is tell Spring Security which IDP (read: Identity Provider, which is a Solid server) will be used. You can do that by creating a application.yml file.
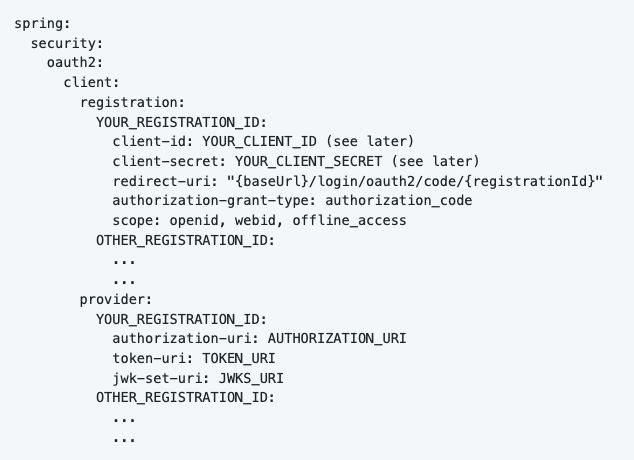
Client registration:
• YOUR_REGISTRATION_ID: this is the name of the IDP (eg: solidcommunity, inrupt, community-solid-server, …)
• YOUR_CLIENT_ID: see next step
• YOUR_CLIENT_SECRET: see next step
• redirect_uri: keep that exact string (see next step)
Provider:
Fetch the OpenID configuration for your IDP. You can do that by searching for: SOLID_SERVER_ADDRESS/.well-known/openid-configuration (eg: https://solidcommunity.net/.well-known/openid-configuration). You get a JSON object with all the necessary fields.
5.2 Register your application with the IDP
We want to register our application at every IDP you configured in application.yml. You can do this by executing a POST request to the “registration_endpoint” (see the OpenID configuration) with this body:
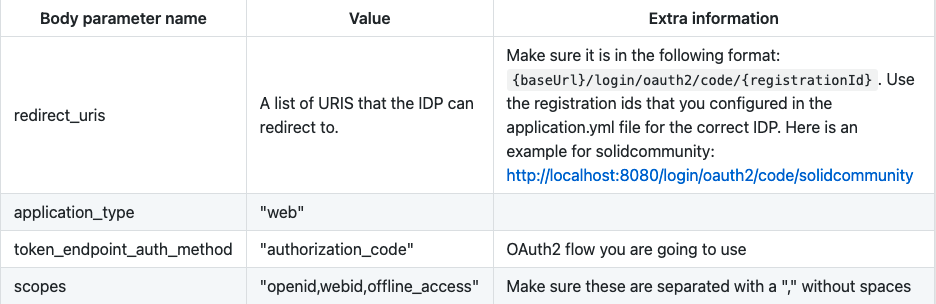
Use the client_id and client_secret from the response to fill in the application.yml file.
5.3 Setting up Spring Security
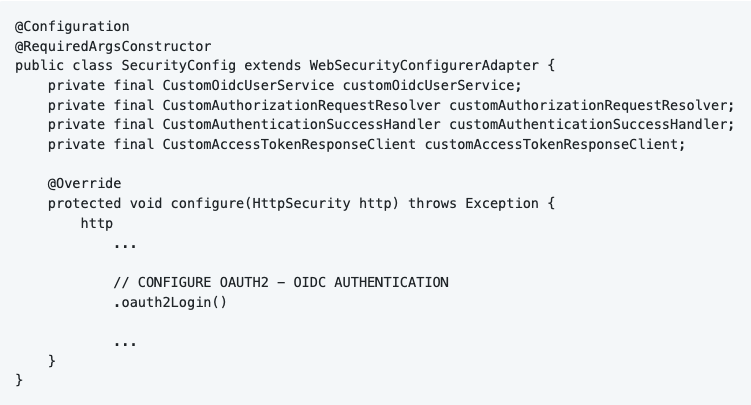
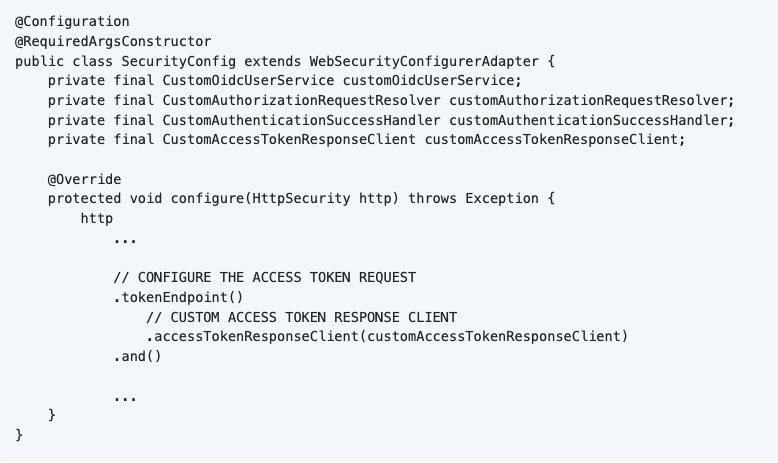
To configure Spring Security in my project, I started off by creating the SecurityConfig class. This class extends WebSecurityConfigurerAdapter from the Spring Security system. We can now implement our own configure() method to provide custom security settings for our application.
First thing we do is enabling CORS and disabling CSRF. We also tell Spring Security to authorize all requests.
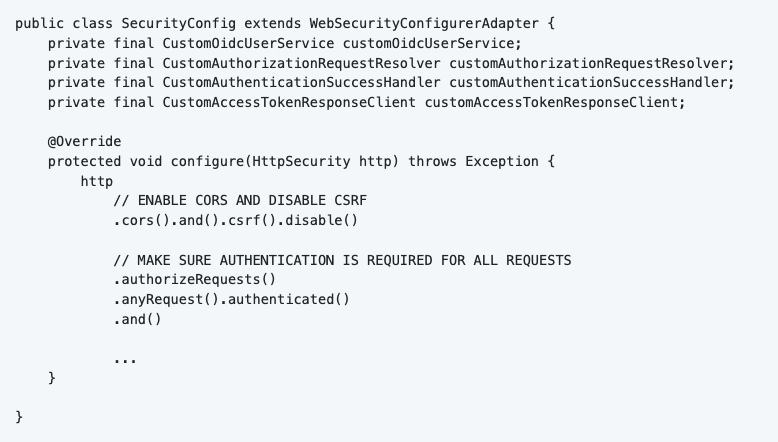
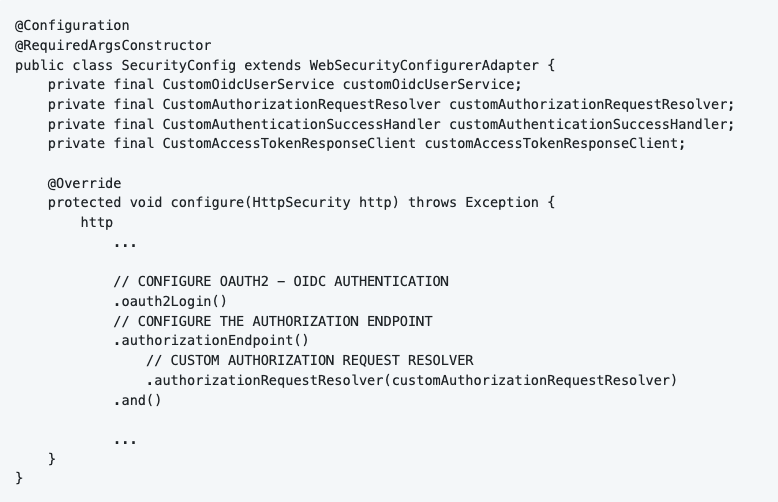
By calling the oauth2Login() function, you setup Spring Security for a default OAuth2 process. As seen above, we need to customize some of the steps in this process. We can do this by creating custom classes that overwrite the default Spring Security configuration.
5.4 Customizing Spring Security
5.4.1 Authorize the application
To authorize your application with an IDP, you have to send a request to that IDP. Spring Security and the OAuth2 Client dependencies can handle this automatically, but for Solid standard we need to add some custom attributes to the request. Specifically to make it PKCE compliant.
I made a custom implementation for the OAuth2AuthorizationRequestResolver so that I can manipulate the request. You can find the custom implementation in the class “CustomAuthorizationRequestResolver”. I also configured this in the SecurityConfig class.
We implement the method “resolve”. The goal is to make an OAuth2AuthorizationRequest object which is PKCE compliant. First of all, we let the default resolver resolve the incoming data. Spring Security will find the correct information in our configuration and put it in an OAuth2AuthorizationRequest object. The problem is, it is not PKCE compliant yet, that’s why I wrote a function “customizeAuthorizationRequest” to make it compliant.

The first step is to remove the “nonce” attribute from the request, we don’t need it for Solid.
In the second step, we generate a code challenge and code verifier (see PKCE explanation above).
Then we add the code challenge and the code challenge method to the request and send it to the Solid server. The server generates the Authorization Code and sends it back to the redirect_url.
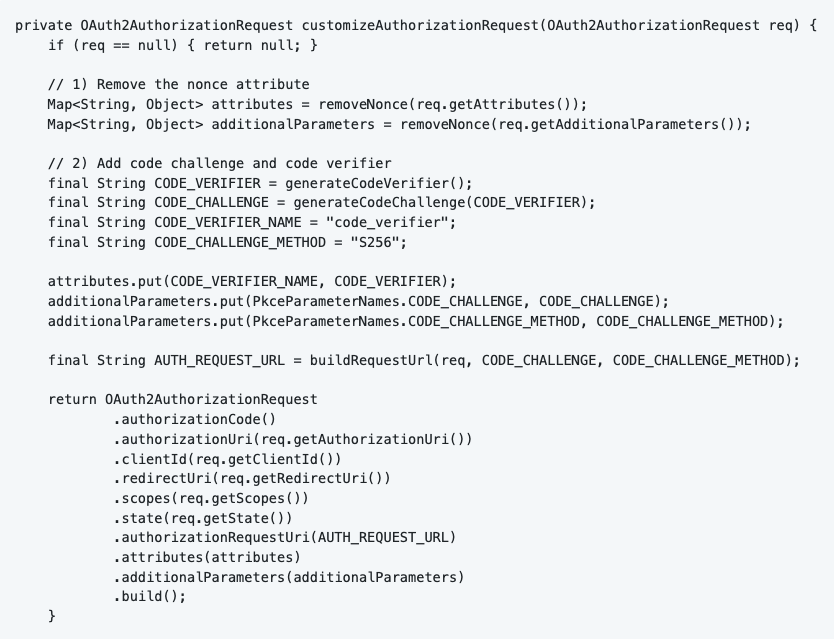
All the other attributes will be automatically filled in by Spring Security based on the configuration in application.yml.
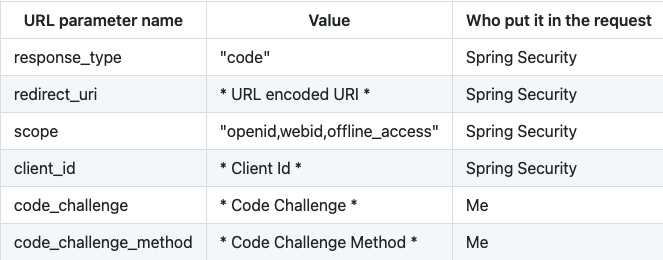
Spring Security will now send a GET request to the Identity Provider’s authorize URL with following URL parameters.
5.4.2 Requesting the access token
The IDP redirects to our application with an Authorization Code. We can now request an access token using this code. With the obtained access token, we can request protected resources on the Solid server.
Solid-OIDC depends on DPoP tokens. We need to make sure that our application creates a DPoP token, and attach it to the access token request.
Spring Security exposes an interface OAuth2AccessTokenResponseClient<T>. The “T” stands for the type of OAuth2 flow you chose, in our case OAuth2AuthorizationCodeGrantRequest. I implemented the interface in CustomAccessTokenResponseClient. Once again, I configured my custom implementation in the SecurityConfig class.
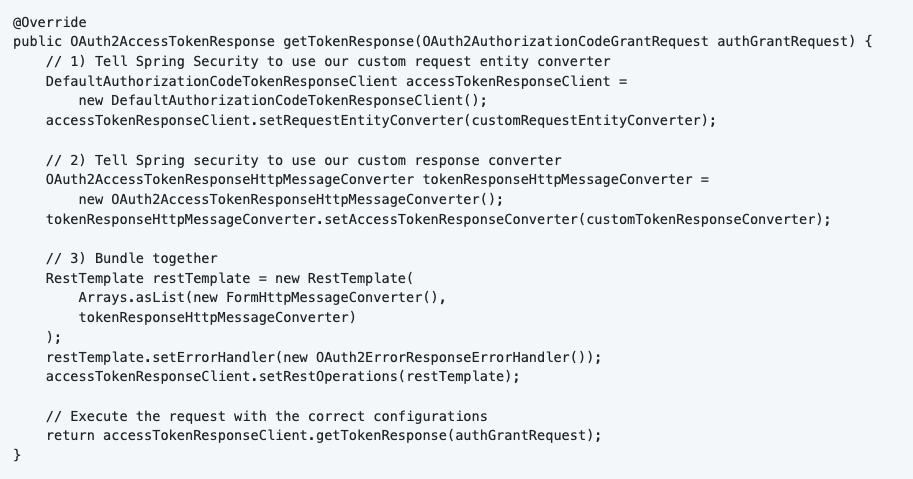
When implementing this interface, it is required to implement a function called “getTokenResponse”. This function is responsible for requesting and returning the access token. I wrote two custom converters to convert the request and the response: CustomRequestEntityConverter and CustomTokenResponseConverter.
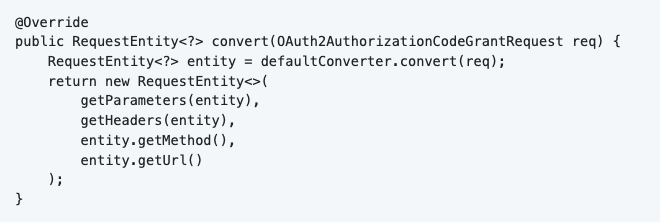
Converting the request
The class implements the interface Converter<OAuth2AuthorizationCodeGrantRequest, RequestEntity<?>>. The OAuth2AuthorizationCodeGrantRequest contains the Authorization Code (obtained in the previous step), and some other fields. We want to convert this object to a new RequestEntity with a DPoP token. This is done by implementing the “convert” function.
In the function, I let the default OAuth2AuthorizationCodeGrantRequestEntityConverter convert the OAuth2AuthorizationCodeGrantRequest to a new RequestEntity. But it does not contain a DPoP token in the headers by default. So I wrote a custom function to do that.** IMAGE #11 HIER **
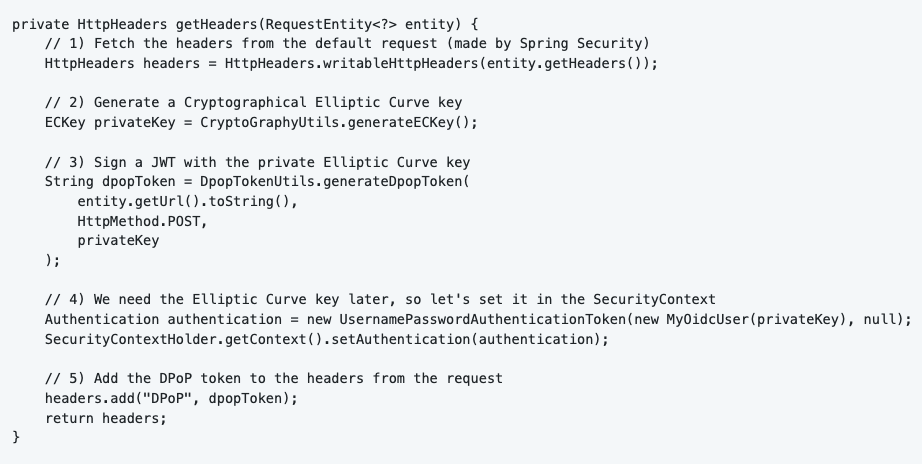
The function “getHeaders” is responsible for merging the default headers (from the access token request) with the DPoP token.
First of all we need to generate an Elliptic Curve key using the Jose library (included with the OAuth2 Client dependency). I created a Utils class for that called “CryptoGraphyUtils”.
Another Utils class “DpopTokenUtils“ handles the creation of the DPoP token. This class will generate a standard JSON Web Token (JWT) and sign it with the generated ECKey (Private Key). The JWK (JSON Web Key) is created by the Public ECKey.
Other parameters used for the creation of the token are: “url” and “method”. DPoP tokens can only be used once for a certain URL, for a certain HTTP method.
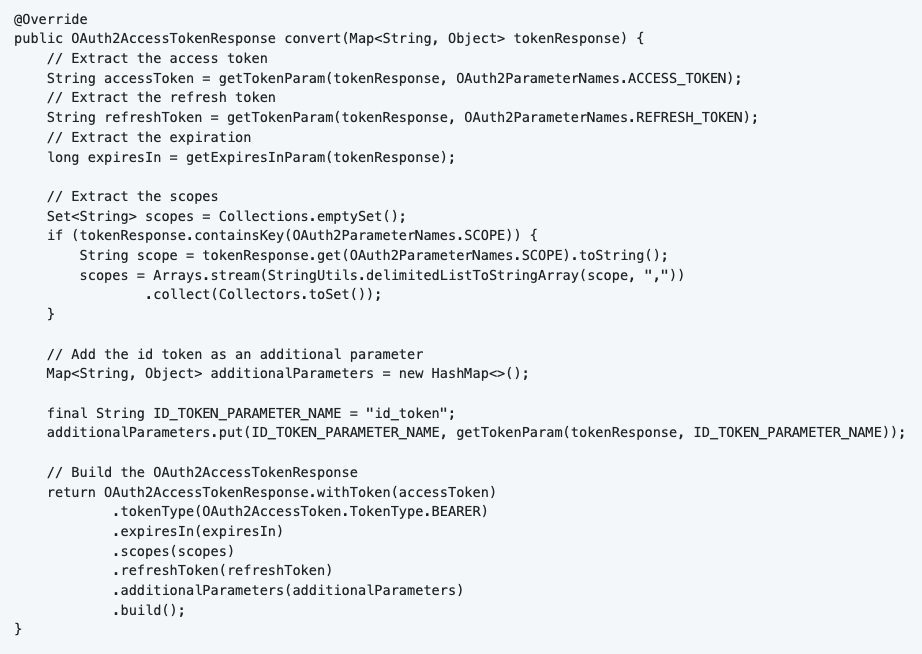
Converting the response
I also had to write a custom Converter for the response called “CustomTokenResponseConverter”. The IDP responds with a JSON (Map<String, Object>) that we want to convert to an OAuth2AccessTokenResponse object. We implement the converter interface, and overwrite the “convert” method once again. The only thing this function does is extract the necessary data, and bundle it in the correct format.
Putting it together
Now you can bind the two converters to the request and send it to the IDP.
5.5 Spring Security Context
Spring Security automatically generates a cookie named “JSESSIONID”. This cookie contains the Spring Security Context. When we received the access token, we want to add a little bit more information in the Security Context. We can do that by providing a custom implementation for the OidcUserService. I called my implementation “CustomOidcUserService”. I configured my custom implementation in the SecurityConfig class.
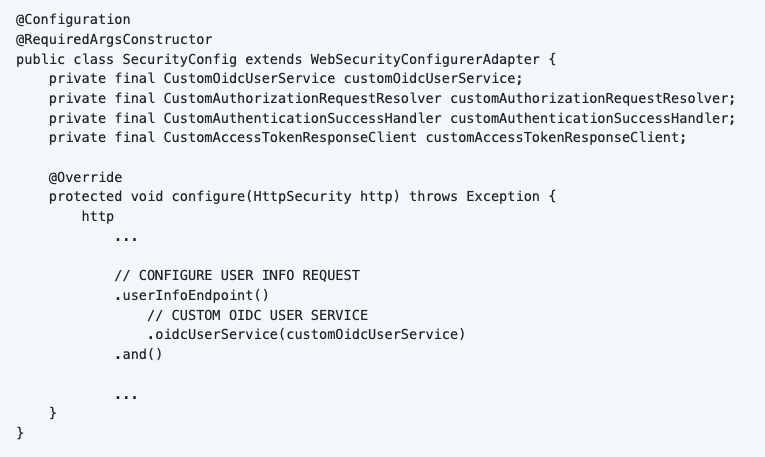
We connect the user to the SecurityContext in the “loadUser” function.

5.6 Other Spring Security Configurations
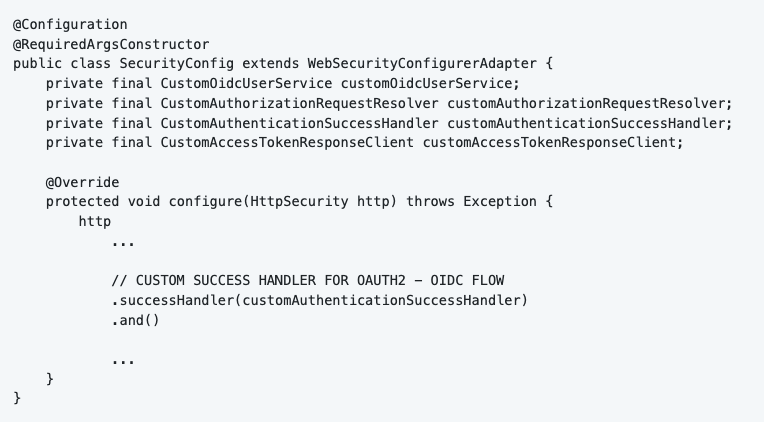
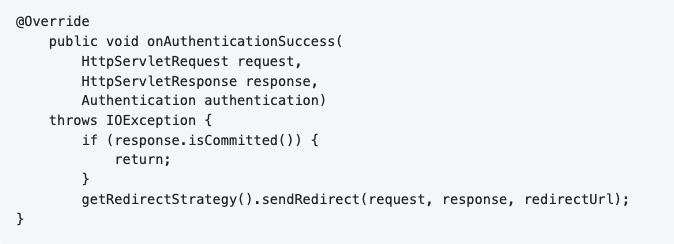
5.6.1 Success Handler
We can create an OAuth2 - OIDC success handler, I chose the name “CustomAuthenticationSuccessHandler”. The reason why we do this is because we want to control what the application does after successful login. The only thing I did in my project is redirecting to an URL.
5.6.2 Logout Handling
Spring Security will automatically invalidate the HTTP cookie on logout. The only thing I do is return a HTTP OK (200) message to the client.

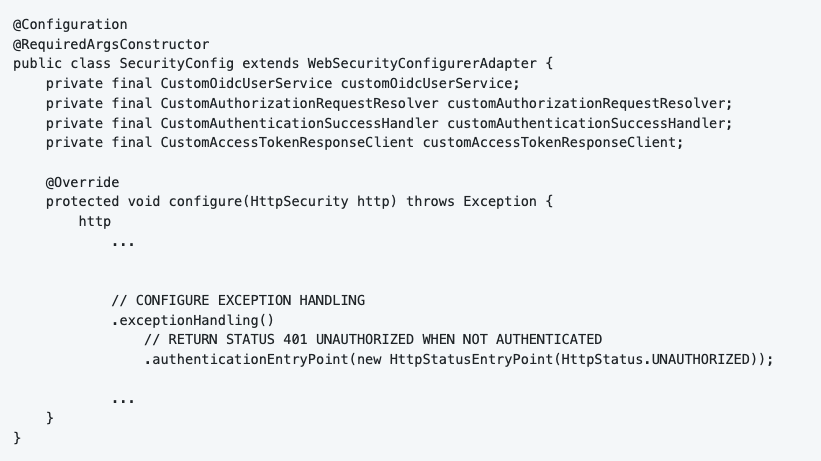
5.6.3 Exception Handling
In the beginning of the article we made sure that all requests are authenticated. Now, what if a user is not authenticated and tries to access our application? We just return HTTP UNAUTHORIZED (401) status.
6.0 Conclusion
You are now successfully logged in with your Solid pod. You can use the obtained access token to fetch protected resources (bear in mind that you still need to combine your access token with a DPoP token).
One thing to note, I am still doing research on how to dynamically register an IDP with Spring Security. This would be beneficial for 2 reasons: users can choose whatever IDP they want, as long as it is an OpenID compliant IDP. The second benefit is that we can also get rid of the configuration files (because clients are registered dynamically).
The code can be found on GitHub.


